1. はじめに
IBM Cloudにおいて、IaaSからPaaSのサービスを呼び出す際には、通常はPublic経由である必要がありました。これは究極的には、異なるIaaSアカウントはPublic経由でしか通信できなかったことに起因しています。
この問題を克服するために、IBM CloudではSerive Endpoint(Private Service EndpointとかCloud Service Endpointとも呼ばれる)という仕組みの提供を開始しました。これにより、PaaSのサービスをPrivate Network経由で呼び出すことが可能になります。
現在、Service Endpointに対応しているサービスはまだまだ少ないですが、IBM Cloud Database(ICD)を例にして、その有効化方法を記載したいと思います。
Customer Portalにて、VRF/Service Endpoint設定変更、設定状況が確認できるようになっています。
Manage->Account->Account Settingから可能です。
2. VRFおよびService Endpointの有効化
Service Endpointを有効化するためには、VRFの有効化も必須になります。
VRFおよびService Endpointが有効化されているかどうかは、ibmcloudコマンドで確認が可能です。以下のリンクを参考にしてください。
https://cloud.ibm.com/docs/services/service-endpoint?topic=service-endpoint-getting-started#getting-started
(注意)言語設定をexport LANG=Cにしておかないと、日本語でチケットが起票されてしまうので、事前に英語にしておくことを推奨します。
# export LANG=C
# ibmcloud account show
Retrieving account IBM of xxxxxxxxxxxxxxx...
OK

Account Name:                       IBM
Account ID:                         xxxxxxxxxxxxxxx
Account Owner:                      xxxxxxxxxxxxxxx
Account Type:                       PAYG
Account Status:                     ACTIVE
Linked Softlayer Account:           xxxxxxxxxxxxxxx
VRF Enabled:                        false
Service Endpoint Enabled:           false
EU Supported                        false
PoC (Commercial Proof of Concept)   false
HIPPA Supported                     false
上記のように、初期状態ではVRFおよびService Endpointは無効化されています。以下のコマンドを発行することで、自動的に有効化を行うためのCaseが起票されますので、あとはそのCaseでの質問・やりとりに回答してください。VRFにする際に一時的なNW断が発生するので、そのためのメンテナンス時間を確保しておくことをおすすめします。
 VRFおよびSerivceEndpointの有効化

# ibmcloud account update --service-endpoint-enable true
Caseで有効化完了の回答をもらったら、再度ibmcloudコマンドを実行してみましょう。VRFとService Endpointが有効化されているはずです。
# ibmcloud account show
Retrieving account IBM of xxxxxxxxxxxxxxx...
OK

Account Name:                       IBM
Account ID:                         xxxxxxxxxxxxxxx
Account Owner:                      xxxxxxxxxxxxxxx
Account Type:                       PAYG
Account Status:                     ACTIVE
Linked Softlayer Account:           xxxxxxxxxxxxxxx
VRF Enabled:                        true
Service Endpoint Enabled:           true
EU Supported                        false
PoC (Commercial Proof of Concept)   false
HIPPA Supported                     false
3. サービスの注文
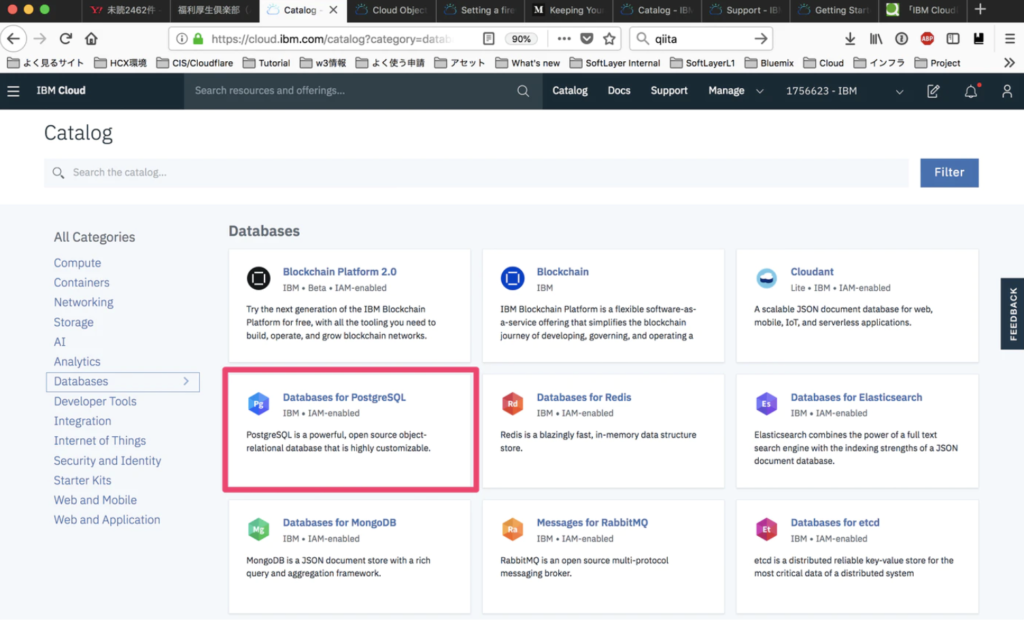
ここでは、東京DCですでにService Endpointに対応しているIBM Cloud Database(PostgreSQL)を選択してみたいと思います。

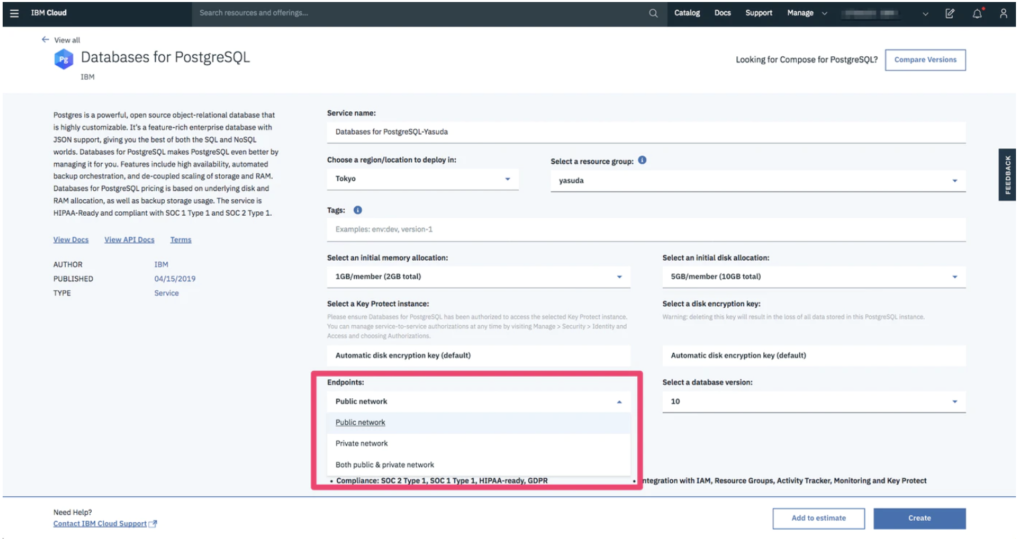
注文画面に行くと、Endpoint情報として、
Public networkPrivate networkBoth public & private network
の3つから選択できるようになっています。

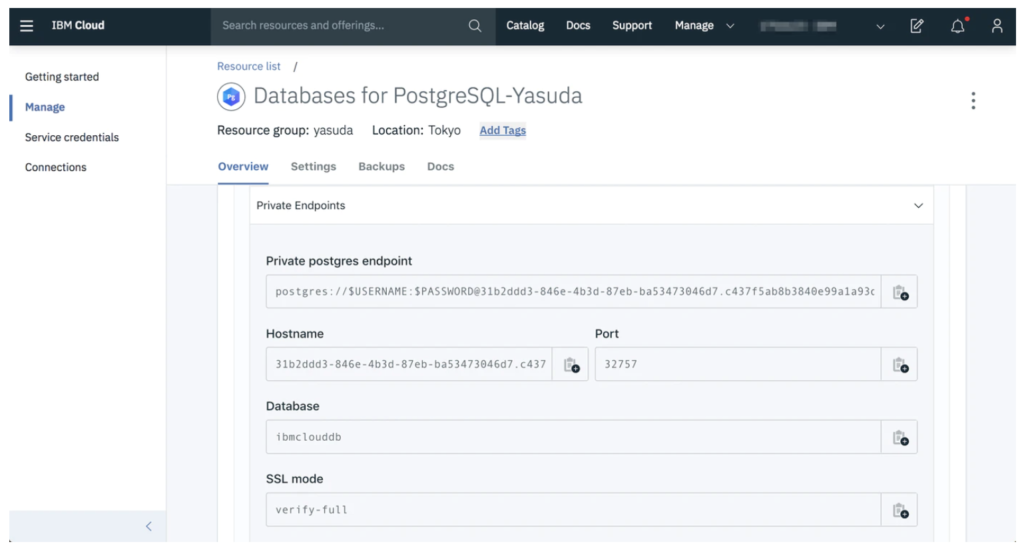
EndpointとしてPrivate networkを選択して注文し、プロビジョニングされてきたサービスのendpoint情報を確認すると、以下のようにPrivate Endpointsが用意されていることがわかります。

同一アカウント内のVSIから、このPrivate Endpointへのpingが返ってくることや該当のポートが空いていることもわかります。
# ping 31b2ddd3-846e-4b3d-87eb-ba53473046d7.c437f5ab8b3840e99a1a93dffcce078d.private.databases.appdomain.cloud
PING icd-prod-jp-tok-db-x.jp-tok.serviceendpoint.cloud.ibm.com (166.9.42.15) 56(84) bytes of data.
64 bytes from f.2a.09a6.ip4.static.sl-reverse.com (166.9.42.15): icmp_seq=1 ttl=57 time=1.98 ms
64 bytes from f.2a.09a6.ip4.static.sl-reverse.com (166.9.42.15): icmp_seq=2 ttl=57 time=1.66 ms
64 bytes from f.2a.09a6.ip4.static.sl-reverse.com (166.9.42.15): icmp_seq=3 ttl=57 time=1.59 ms
64 bytes from f.2a.09a6.ip4.static.sl-reverse.com (166.9.42.15): icmp_seq=4 ttl=57 time=1.57 ms
64 bytes from f.2a.09a6.ip4.static.sl-reverse.com (166.9.42.15): icmp_seq=5 ttl=57 time=1.59 ms
64 bytes from f.2a.09a6.ip4.static.sl-reverse.com (166.9.42.15): icmp_seq=6 ttl=57 time=1.56 ms
64 bytes from f.2a.09a6.ip4.static.sl-reverse.com (166.9.42.15): icmp_seq=7 ttl=57 time=1.64 ms
64 bytes from f.2a.09a6.ip4.static.sl-reverse.com (166.9.42.15): icmp_seq=8 ttl=57 time=1.65 ms


# nmap -Pn 31b2ddd3-846e-4b3d-87eb-ba53473046d7.c437f5ab8b3840e99a1a93dffcce078d.private.databases.appdomain.cloud -p 32757

Starting Nmap 6.40 ( http://nmap.org ) at 2019-04-15 17:58 CDT
Nmap scan report for 31b2ddd3-846e-4b3d-87eb-ba53473046d7.c437f5ab8b3840e99a1a93dffcce078d.private.databases.appdomain.cloud (166.
Host is up (0.0034s latency).
Other addresses for 31b2ddd3-846e-4b3d-87eb-ba53473046d7.c437f5ab8b3840e99a1a93dffcce078d.private.databases.appdomain.cloud (not scanned): 166.9.44.10 166.9.42.15
rDNS record for 166.9.40.12: c.28.09a6.ip4.static.sl-reverse.com
PORT      STATE SERVICE
32757/tcp open  unknown

Nmap done: 1 IP address (1 host up) scanned in 1.13 seconds
ちなみに、最近注文したVSIでは、以下のようにService EndpointのIPアドレス(今回の例では166.9.42.15)に対してもstatic routeが構成されています。
# ip r
default via xx.xx.xx.xx dev eth1
10.0.0.0/8 via 10.129.177.1 dev eth0
10.129.177.0/26 dev eth0 proto kernel scope link src 10.129.177.34
161.26.0.0/16 via 10.129.177.1 dev eth0
166.8.0.0/14 via 10.129.177.1 dev eth0
169.56.30.112/28 dev eth1 proto kernel scope link src 169.56.30.116
169.254.0.0/16 dev eth0 scope link metric 1002
169.254.0.0/16 dev eth1 scope link metric 1003
