OpenShift 模板是一种资源定义,用于声明和配置一组相关的 Kubernetes 资源。这些模板允许用户使用参数化的方式来定义资源配置,从而在不同环境中复用和灵活部署应用程序。模板使得复杂应用的部署变得简单和一致。
红帽 OpenShift 模板 是一种自定义资源,通常定义为 YAML 或 JSON 文件,其中包含一组 OpenShift 和 Kubernetes 资源。 模板接受参数,因此您可以在定义这些资源时声明可配置的值。 OpenShift 通 过用实际值替换参数引用并创建一组自定义资源来处理模板。
为什么需要模板?
简化部署:
- 模板可以将一组相关资源(如 DeploymentConfig、Service、Route 等)打包在一起,一次性部署。
提高复用性:
- 通过参数化配置,模板可以在不同环境中重复使用,只需改变参数值即可。
确保一致性:
- 使用模板可以确保在不同环境中部署的资源配置一致,减少人为错误。
简化管理:
- 模板使得对一组资源的管理变得简单,只需管理模板文件即可,而无需逐个管理每个资源。
模板的结构
一个 OpenShift 模板包含以下几个主要部分:
- metadata:
- 模板的元数据,包含名称、标签等。
- parameters:
- 参数列表,定义模板中的动态变量,可以在模板应用时进行替换。
- objects:
- 资源对象列表,定义要创建的 Kubernetes 资源。
详细说明
1.metadata:
metadata:
  name: simple-nginx-template
- 定义模板的名称
simple-nginx-template。
2.parameters:
parameters:
  - name: APP_NAME
    description: The name of the application
    value: nginx-app
  - name: IMAGE
    description: The Docker image to use for the application
    value: nginx:latest
- 定义两个参数
APP_NAME和IMAGE,分别用于设置应用名称和 Docker 镜像。
parameters:
- description: Myapp configuration data
  name: MYPARAMETER
  required: true
required 属性设置为 true。 您可以通过省略 此属性或将其值设置为 false 来定义可选参数。
通过使用 value 属性,可选参数和必填参数都可以提供默认值。 例如:
parameters:
- description: Myapp configuration data
  name: MYPARAMETER
  value: /etc/myapp/config.ini
此外,如果您使用 from 属性指定模式,OpenShift 可以为参数生成随机默认值,如以下示例所示:
parameters:
- description: ACME cloud provider API key
name: APIKEY
generate: expression from:"[a-zA-Z0-9]{12}"
3.objects:
objects:
  - apiVersion: apps.openshift.io/v1
    kind: DeploymentConfig
    metadata:
      name: ${APP_NAME}
    spec:
      replicas: 1
      selector:
        app: ${APP_NAME}
      template:
        metadata:
          labels:
            app: ${APP_NAME}
        spec:
          containers:
            - name: ${APP_NAME}
              image: ${IMAGE}
              ports:
                - containerPort: 80
  - apiVersion: v1
    kind: Service
    metadata:
      name: ${APP_NAME}
    spec:
      selector:
        app: ${APP_NAME}
      ports:
        - protocol: TCP
          port: 80
          targetPort: 80
- 定义两个资源对象:
DeploymentConfig和Service。 DeploymentConfig使用参数${APP_NAME}和${IMAGE},定义应用的部署配置。Service使用参数${APP_NAME},定义服务配置。
使用模板
1.创建模板: 将模板保存到一个文件中,例如 simple-nginx-template.yaml,然后使用 oc create 命令创建模板:
oc create -f simple-nginx-template.yaml
2.使用模板创建应用: 使用 oc new-app 命令基于模板创建应用:
oc new-app --template=simple-nginx-template -p APP_NAME=mynginx -p IMAGE=nginx:latest
模板的优势
- 快速部署:
- 一次性创建所有相关资源,省时省力。
- 配置灵活:
- 通过参数化配置,可以根据需要灵活调整资源配置。
- 易于维护:
- 只需维护模板文件即可,同时可以在版本控制系统中管理模板,确保一致性。
- 提高开发效率:
- 开发团队可以共享和复用模板,减少重复工作。
通过使用 OpenShift 模板,可以显著简化和加速应用的部署和管理,提高工作效率和配置一致性。
一个模版的例子
一个nodejs的 demo 模版,定义了 build config,deployment config,service。
- 1. 创建模板: 将下面 YAML 文件保存为
nodejs-demo-template.yaml。
apiVersion: v1
kind: Template
metadata:
  name: nodejs-demo-template
  annotations:
    description: "A simple Node.js application template"
    tags: "nodejs,template,demo"
parameters:
- name: GIT_URI
  description: The URI of the Git repository with the application source code
  required: true
- name: GIT_REF
  description: The branch/tag reference of the Git repository
  value: "main"
  required: true
- name: APP_NAME
  description: The name of the application
  value: "demo"
  required: true
objects:
- apiVersion: build.openshift.io/v1
  kind: BuildConfig
  metadata:
    name: ${APP_NAME}
  spec:
    source:
      git:
        uri: ${GIT_URI}
        ref: ${GIT_REF}
    strategy:
      sourceStrategy:
        from:
          kind: ImageStreamTag
          namespace: openshift  #注意这里
          name: 'nodejs:18-ubi8' #注意这里
    output:
      to:
        kind: ImageStreamTag
        name: "${APP_NAME}:latest"
- apiVersion: image.openshift.io/v1
  kind: ImageStream
  metadata:
    name: ${APP_NAME}
- apiVersion: apps.openshift.io/v1
  kind: DeploymentConfig
  metadata:
    name: ${APP_NAME}
  spec:
    replicas: 1
    selector:
      app: ${APP_NAME}
    template:
      metadata:
        labels:
          app: ${APP_NAME}
      spec:
        containers:
        - name: ${APP_NAME}
          image: "${APP_NAME}:latest"
          ports:
          - containerPort: 8080
- apiVersion: v1
  kind: Service
  metadata:
    name: ${APP_NAME}
  spec:
    selector:
      app: ${APP_NAME}
    ports:
    - protocol: TCP
      port: 80
      targetPort: 3000 # 注意端口号
- 2.git nodejs demo代码
const express = require('express');

const app = express();
const port = 3000;

app.get('/test', (req, res) => {
  return res.status(200).send('hello world');
});

// 启动服务器
app.listen(port, () => {
  console.log(`服务器运行在 http://localhost:${port}`);
});
- 3.使用
oc命令创建模板。
oc create -f nodejs-demo-template.yaml

- 4.查看刚刚创建的模版。
oc get template

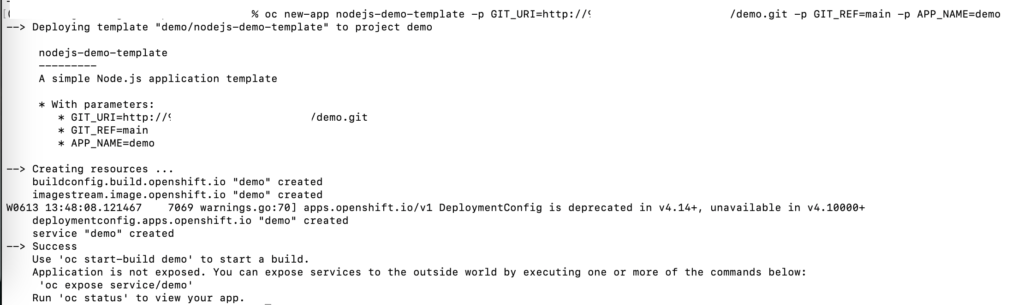
- 5.实例化模版
oc new-app nodejs-demo-template -p GIT_URI=http://xxx:3001/xxxx/demo.git -p GIT_REF=main -p APP_NAME=demo