1. 隐藏/取消List的分割线
iOS 13.0+ (全局效果)
List (0..<50) { index in
      Text("\(index)")
 }
 .onAppear {
      UITableView.appearance().separatorStyle = .none
 }
iOS 14.0+
List (0..<50) { index in
      Text("\(index)")
 }
.listStyle(SidebarListStyle())
iOS 15.0+
func listRowSeparator(_ visibility: Visibility, edges: VerticalEdge.Set = .all) -> some View

其调用方式为
List (0..<50) { index in
      Text("\(index)")
          .listRowSeparator(.hidden)
 }
2. 设置左滑删除Cell
struct ListViewDemo: View {

    //数据数组
    @State private var streets = [Street(name: "The Lodon Street"), Street(name: "The Joe's Street"), Street(name: "The House Street")]

    var body: some View {

        func deleteRow(at offsets:IndexSet) {
            streets.remove(atOffsets:offsets)
        }

        return List{
            ForEach(streets, id: \.self) { street in
                StreetRow(street: street)
            }.onDelete(perform: deleteRow)
        }
    }
}
3. List添加section分组以及设置grouped类型
struct ListViewDemo: View {
    var body: some View {
        return List{
            Section(header:Text("some streets one"), footer: Text("Fotter1")){
                TaskRow()
                TaskRow()
                TaskRow()
            }
            Section(header:Text("some streets two"), footer: Text("Fotter2")){
                TaskRow()
                TaskRow()
                TaskRow()
            }
        }
    }
}

struct TaskRow: View {
    var body: some View {
        Text("Task data goes here")
    }
}
在UITableView中我们可以设置plain和grouped两种样式,而默认是plain样式,SwiftUI也一样。在swiftUI中设置grouped样式很简单,只需要为list添加相应的listStyle modifier:
struct ListViewDemo: View {
    var body: some View {
        return List{
            Section(header:Text("some streets one"), footer: Text("Fotter1")){
                TaskRow()
                TaskRow()
                TaskRow()
            }
            Section(header:Text("some streets two"), footer: Text("Fotter2")){
                TaskRow()
                TaskRow()
                TaskRow()
            }
        }.listStyle(GroupedListStyle())
    }
}
4. 点击Cell跳转的实现
struct ListViewDemo: View {
    var body: some View {
        let streets = [
        Street(name: "The Lodon Street"),
        Street(name: "The Joe's Street"),
        Street(name: "The House Street")
        ]

        return NavigationView{
            List(streets){ street in
                NavigationLink(destination:ListViewDetial()){
                    StreetRow(street: street)
                }
            }.navigationBarTitle("Streets")
        }
    }
}
5. 去除Cell右边自带的箭头
NavigationLink会自动为List的Cell添加一个箭头,要想去掉箭头将Cell 放在NavigationLink的外边即可
struct ListViewDemo: View {
        var body: some View {
            let streets = [
            Street(name: "The Lodon Street"),
            Street(name: "The Joe's Street"),
            Street(name: "The House Street")
            ]

            return NavigationView{
                List(streets){ street in
                    ZStack{
                        NavigationLink(destination:ListViewDetial()){
                            EmptyView()
                        }

                        StreetRow(street: street)
                    }

                }.navigationBarTitle("Streets")
            }
        }
    }
6.直接依赖Row的显示设定
struct PrecentList: View {
    @State var list:[Int] = []
    var body: some View {
        List(list,id:\.self){ i in
            Image(systemName: "heart.fill").foregroundColor(.red).font(.headline)
            Text("完成度:")
            Text("\(i)")
                .bold()
                .foregroundColor(.white).padding(.all,5)
                .frame(width:(250 * CGFloat(i) / 100) + 40,alignment: .trailing)
                .background(RoundedRectangle(cornerRadius: 10).fill(Color.blue))
        }
        .onAppear{
            _ = (0...30).map{ _ in
                self.list.append(Int.random(in: 0...50))
            }
        }
    }
}

7.设置单个Row的背景
.listRowBackground(Color.red)
struct ColorList:View{
    var colors:[Color] = [.red,.yellow,.blue,.green,.pink,.orange]
    var body:some View{
        List{
            ForEach(0..<20) { i in
                Text("ID:\(i)").listRowBackground(self.colors[i % self.colors.count])
            }
        }
    }
}

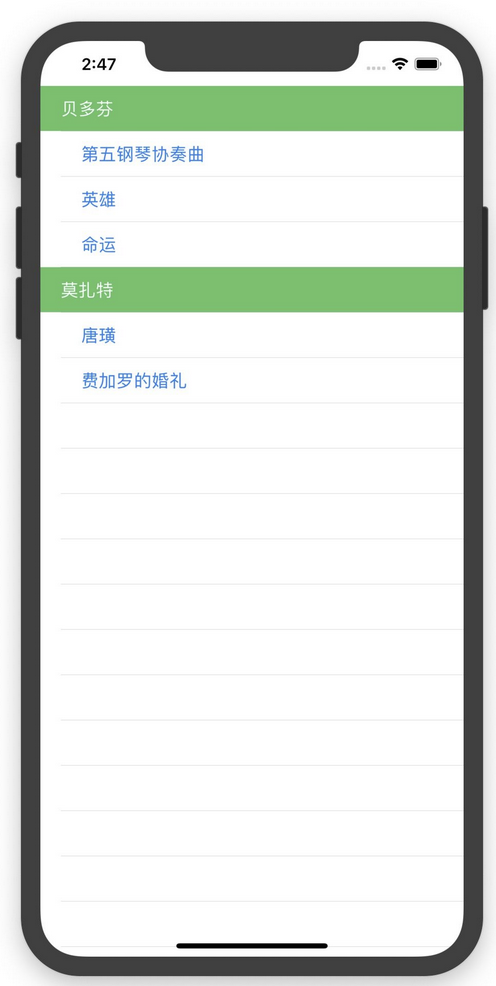
8.设置Row的边界缩进
.listRowInsets(EdgeInsets(top: 0, leading: 50, bottom: 0, trailing: 0))
struct InsetsList:View{
    var body:some View{
        List{
            Text("贝多芬").foregroundColor(.white)
                .listRowBackground(Color.green)
            Text("第五钢琴协奏曲").foregroundColor(.blue)
                .listRowInsets(.init(top: 0, leading: 40, bottom: 0, trailing: 0))
            Text("英雄").foregroundColor(.blue)
                .listRowInsets(.init(top: 0, leading: 40, bottom: 0, trailing: 0))
            Text("命运").foregroundColor(.blue)
                .listRowInsets(.init(top: 0, leading: 40, bottom: 0, trailing: 0))
            Text("莫扎特").foregroundColor(.white)
                .listRowBackground(Color.green)
            Text("唐璜").foregroundColor(.blue)
                .listRowInsets(.init(top: 0, leading: 40, bottom: 0, trailing: 0))
            Text("费加罗的婚礼").foregroundColor(.blue)
                .listRowInsets(.init(top: 0, leading: 40, bottom: 0, trailing: 0))
        }
    }
}