背景
在微信小程序中需要使用手机拍摄照片以及视频上传到后台进行进一步的操作,需要解决以下两个问题:
- 微信小程序如何拍摄照片及视频
- 如何将拍摄的照片及视频上传到后台进行存储
解决方案
前端开发:微信小程序原生
后端开发:Flask
如何拍摄照片及视频
微信小程序如何拍摄照片及视频:使用wx.chooseMediaAPI来实现
该API用于拍摄或从手机相册中选择图片或视频,文档链接为:wx.chooseMedia(Object object) | 微信开放文档
简单示例:
function test()
{
  wx.chooseMedia({
        count: 1,
        mediaType: ['image'],
        sourceType: ['camera'],
        camera: 'back',
        success(res) {
          console.log(res)
        },
        fail(res){
          console.log(res)
        }
  })
}
主要参数含义如下:
- count:最多可以选择的文件个数
- mediaType:文件类型,可选值为:[‘image’]/[‘video’]/[‘image’,’video’],默认值为[‘image’,’video’],意为即允许拍摄图片也允许拍摄视频
- sourceType:文件来源,可选值为[‘album’]/[ ‘camera’]/[‘album’, ‘camera’],默认值为[‘album’, ‘camera’],意为即允许从相册选择,也允许直接拍摄
- camera:仅在 sourceType 为 camera 时生效,使用前置或后置摄像头,可选值为’back’/’front’,默认值为’back’
回调参数res内容如下:
- tempFiles:本地临时文件列表,其中的tempFilePath是本地临时文件路径,也是该示例中的核心参数;
- type:文件类型
(更多参数以及回调参数请参考官方文档)
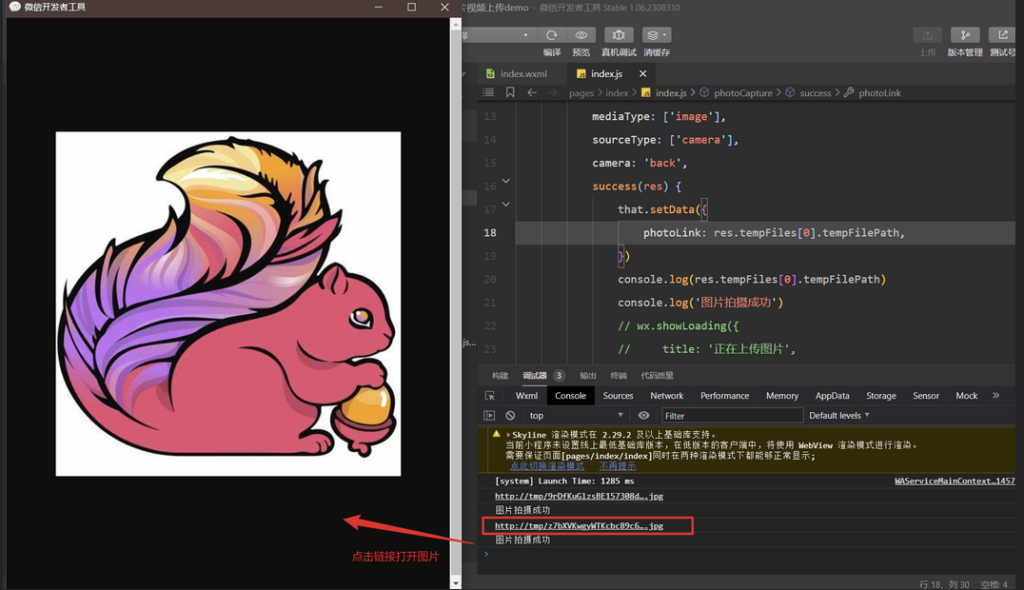
由上可知,我们首选需要调用wx.chooseMedia函数,选择拍摄照片或者视频,然后在回调函数中拿到本地临时文件路径,这样就获取到了拍摄的照片或视频,但我们拿到的并不是一个完整的.png/.mp4文件,而是一个临时文件链接,例如:
http://tmp/z7bXVKwgyWTKcbc89c663afd501de1d27ed321f8591c.jpg
这样的文件链接可以在开发者工具中打开:

但该链接无法在外部进行访问,因此就涉及到如何将该链接所代表的文件上传到后台的问题;
这样的文件在小程序中被称为”本地临时文件“,仅在当前生命周期内保证有效,重启之后不一定可用;更多内容请参考官方文档:文件系统 | 微信开放文档
如何上传后台进行存储
如何将拍摄的照片及视频上传到后台进行存储:
- 前端:使用
wx.uploadFileAPI - 后端:使用
request.files['photo'].stream.read()来读取文件
前端代码
有关wx.uploadFile可以参考:UploadTask | 微信开放文档
主要参数有:
- url:开发者服务器地址,即要访问的接口
- filePath:要上传的文件路径(本地路径),这里即是通过wx.chooseMedia回调中的tempFilePath
- formData:HTTP 请求中其他额外的 form data,允许我们传输文件的时候携带一些其他的参数,比如说文件名称;
因此完整的前端代码如下(上传图片):
//拍摄照片
photoCapture() {
    let that = this
    wx.chooseMedia({
        count: 1,
        mediaType: ['image'],
        sourceType: ['camera'],
        camera: 'back',
        success(res) {
            that.setData({
                photoLink: res.tempFiles[0].tempFilePath,
            })
            console.log(res.tempFiles[0].tempFilePath)
            console.log('图片拍摄成功')
            wx.showLoading({
                title: '正在上传图片',
                mask: true
            })

            //图片上传
            wx.uploadFile({
                url: 'http://localhost:5000/uploadImage',
                filePath: res.tempFiles[0].tempFilePath,
                name: 'photo',
                formData: {
                    fileName: 'photoTest.png'
                },
                success(res) {
                    wx.showToast({
                        title: '图片上传成功',
                    })
                }
            })
        },
        fail(res) {
            console.log('图片拍摄失败')
        }
    })
}
首先拍摄照片,然后上传文件
后端代码
后端使用flask进行开发
通过request.files来接收文件
通过request.form来接收wx.uploadFile的formData中携带的数据
通过write方法将接收到的文件保存到本地
因此完整的后端代码如下(上传图片):
app = Flask(__name__)

@app.route('/')
def hello_world():
    return 'Hello World'

# 图片上传
@app.route('/uploadImage', methods=["POST"])
def uploadImage():
    video = request.files['photo'].stream.read()
    name = request.form['fileName']
    if not files_exists(name, 2):
        file_path = os.getcwd() + '\\images\\' + name
        with open(file_path, 'ab') as f:
            f.write(video)
        return 'image upload success'
    else:
        return 'image already exist'

# 判断文件是否已经存在
def files_exists(file_name, choice):
    if choice == 1:
        path = os.getcwd() + '\\videos\\'
        video_path = os.path.join(path, file_name)
        return os.path.isfile(video_path)
    else:
        path = os.getcwd() + '\\images\\'
        image_path = os.path.join(path, file_name)
        return os.path.isfile(image_path)

if __name__ == '__main__':
    app.run(host='127.0.0.1', port=5000)
运行结果
首先启动后端服务,然后小程序初始页面如下:

点击按钮拍摄图片,可以看到图片成功预览在小程序中:

在NetWork中可以看到接口的返回值:

图片上传成功;在后端也能看到图片已经保存下来了:

完整代码
前端代码
index.wxml:
<button type="primary" bind:tap="photoCapture">点击拍摄图片</button>
<image src="{{photoLink}}"></image>
<button type="primary" bind:tap="videoCapture">点击拍摄视频</button>
<image src="{{videoLink}}"></image>
index.wxss:
page {
  padding-top: 100rpx;
  height: 100vh;
  display: flex;
  flex-direction: column;
  align-items: center;
}
image{
  margin-top: 50rpx;
  margin-bottom: 50rpx;
  width: 600rpx;
  height: 400rpx;
  border: 1px solid black;
}
index.js:
Page({
  data: {
    photoLink: '',
    videoLink: '',
  },

  //拍摄照片
  photoCapture() {
    let that = this
    wx.chooseMedia({
      count: 1,
      mediaType: ['image'],
      sourceType: ['camera'],
      camera: 'back',
      success(res) {
        that.setData({
          photoLink: res.tempFiles[0].tempFilePath,
        })
        console.log(res.tempFiles[0].tempFilePath)
        console.log('图片拍摄成功')
        wx.showLoading({
          title: '正在上传图片',
          mask: true
        })

        //图片上传
        wx.uploadFile({
          url:'http://localhost:5000/uploadImage',
          filePath: res.tempFiles[0].tempFilePath,
          name: 'photo',
          formData: {
            fileName:'photoTest.png'
          },
          success(res) {
            wx.showToast({
              title: res.data,
            })
          }
        })
      },
      fail(res) {
        console.log('图片拍摄失败')
      }
    })
  },

  //拍摄视频
  videoCapture() {
    let that = this
    wx.chooseMedia({
      count: 1,
      mediaType: ['video'],
      sourceType: ['camera'],
      maxDuration: 60,
      camera: 'back',
      success(res) {
        that.setData({
          videoLink: res.tempFiles[0].thumbTempFilePath
        })
        console.log('视频拍摄成功')
        console.log(res.tempFiles[0].tempFilePath)
        wx.showLoading({
          title: '正在上传视频',
          mask: true
        })

        //视频上传
        wx.uploadFile({
          url:'http://localhost:5000/uploadVideo',
          filePath: res.tempFiles[0].tempFilePath,
          name: 'video',
          formData: {
            fileName:'videoTest.mp4'
          },
          success(res) {
            wx.showToast({
              title: res.data,
            })
          }
        })
      },
      fail(res) {
        console.log('图片拍摄失败')
      }
    })
  }
})
后端代码
from flask import Flask, request
import os

app = Flask(__name__)

@app.route('/')
def hello_world():
    return 'Hello World'

@app.route('/uploadVideo', methods=["POST"])
def uploadVideo():
    video = request.files['video'].stream.read()
    name = request.form['fileName']
    if not files_exists(name, 1):
        file_path = os.getcwd() + '\\videos\\' + name
        with open(file_path, 'ab') as f:
            f.write(video)
        return 'upload success'
    else:
        return 'already exist'


@app.route('/uploadImage', methods=["POST"])
def uploadImage():
    video = request.files['photo'].stream.read()
    name = request.form['fileName']
    if not files_exists(name, 2):
        file_path = os.getcwd() + '\\images\\' + name
        with open(file_path, 'ab') as f:
            f.write(video)
        return 'upload success'
    else:
        return 'already exist'


def files_exists(file_name, choice):
    if choice == 1:
        path = os.getcwd() + '\\videos\\'
        video_path = os.path.join(path, file_name)
        return os.path.isfile(video_path)
    else:
        path = os.getcwd() + '\\images\\'
        image_path = os.path.join(path, file_name)
        return os.path.isfile(image_path)


if __name__ == '__main__':
    app.run(host='127.0.0.1', port=5000)
此外文件上传到后台也可以采用base64编码的方式进行上传