我们先看一下苹果官方对UIEdgeInsets说明:
typedef struct UIEdgeInsets {
    CGFloat top, left, bottom, right;
// specify amount to inset (positive) for each of the edges. values can be negative to 'outset'
} UIEdgeInsets;
- 官方:specify amount to inset (positive) for each of the edges. values can be negative to ‘outset’ .
- 解释:对每条边向内方向的偏移量,可以为正值(向内偏移)也可以为负值(向外偏移)。

基本使用:
xxx.edgeInsets = UIEdgeInsetsMake(.0, .0, .0, .0);

//例如我们设置UICollectionView的edgeInset会使collectionView产生内偏移
UICollectionViewFlowLayout *layout = [[UICollectionViewFlowLayout alloc] init];
layout.sectionInset = UIEdgeInsetsMake(20.0, .0, .0, .0);
引入正题:
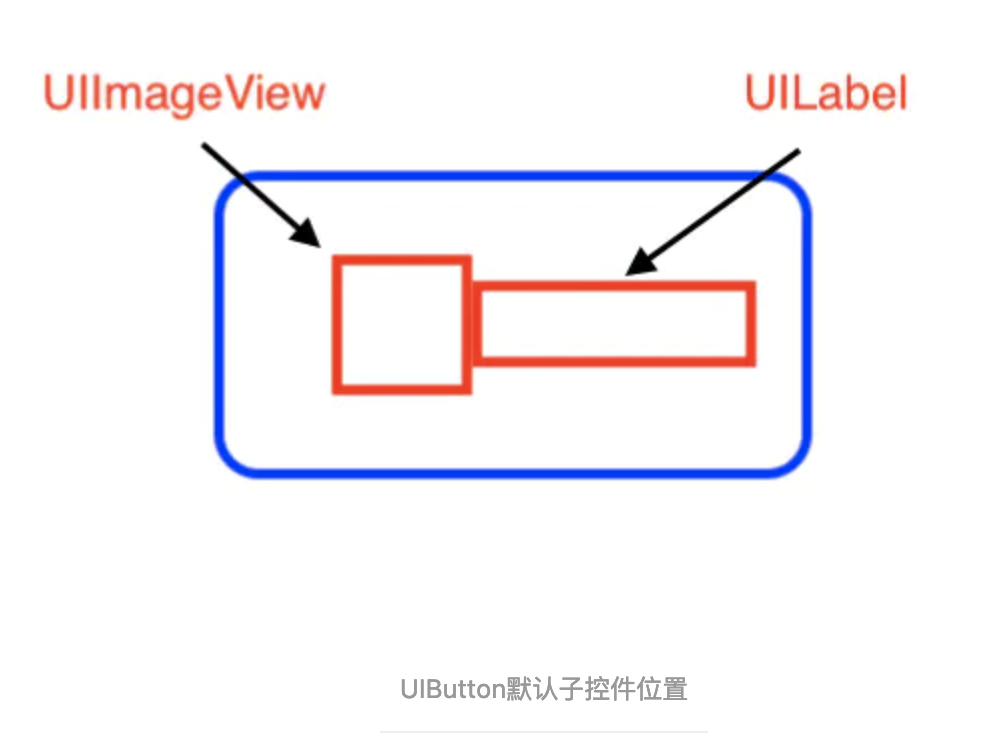
然而,UIButton的内偏移量与其他控件有些区别,
因为UIButton内部默认有两个子控件:UILabel和UIImageView
所以UIButton在内偏移量的计算上会有差异。
为什么?先卖个关子,下文解释。
UIButtonEdgeInsets:
需求:通过修改edgeInsets,改变Button内部的ImageView和titleLabel的相对位置。
小编做了一个demo,效果如下图:

思路:通过修改button的两个属性:titleEdageInsets和imageEdgeInsets,从而达到最终的具体需求。这里列出了三个比较常见的需求:
- image左 title右
- image右 title左
- image上 title下
场景一:左图右字
button.titleEdgeInsets = UIEdgeInsetsMake(0, 10.0, 0, 0);
语法解释:设置了title的左边线的内偏移量为10.0,
但经测试,
注意:实际上title和Image直接只有5.0的距离
图解如下:
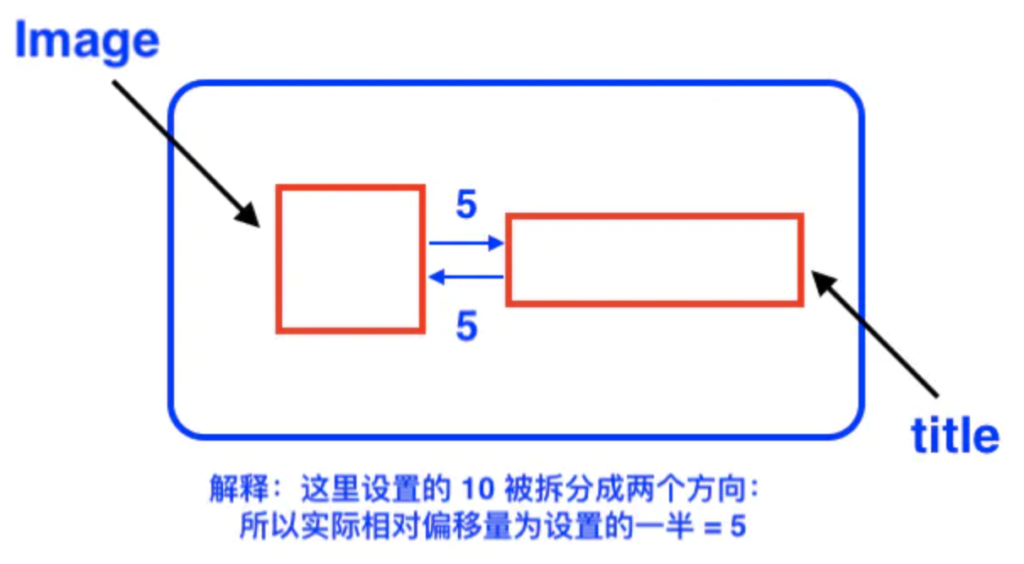
在这种场景下:
- title的 上边线、右边线、下边线 内偏移 是相对于contentView的
- image的 上边线、左边线、下边线 内偏移 是相对于contentView的
- title的 左边线 内偏移 相对于image
- image的 右边线 内偏移 相对于title
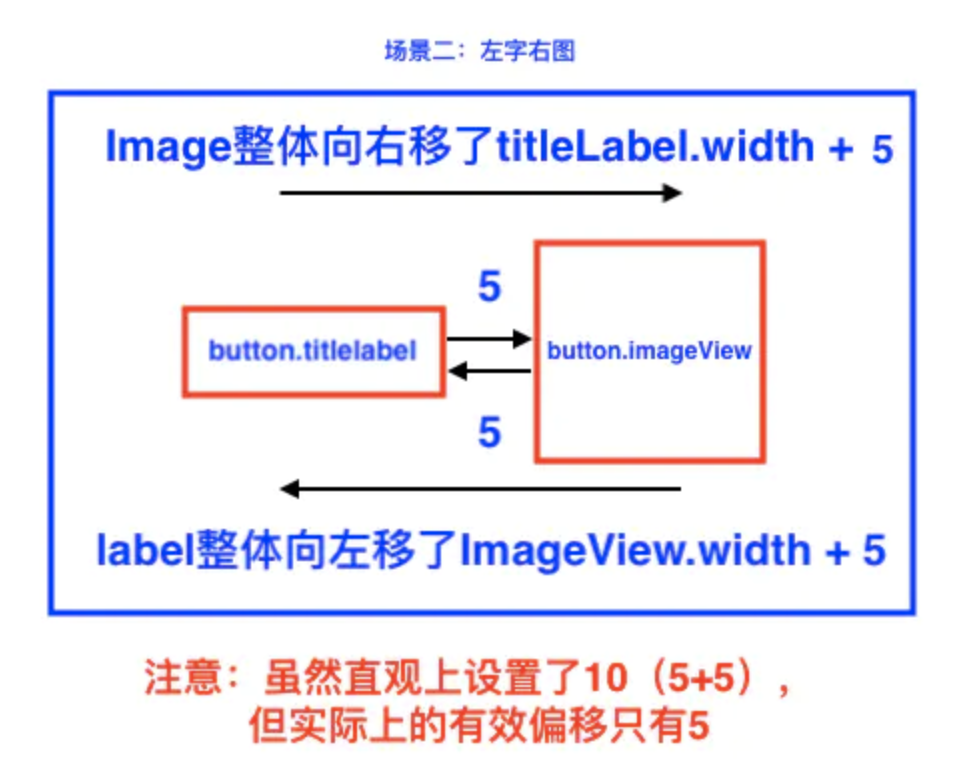
场景二:左字右图
button.titleEdgeInsets = UIEdgeInsetsMake(.0, - button.imageView.bounds.size.width - 10.0, .0, button.imageView.bounds.size.width);
button.imageEdgeInsets = UIEdgeInsetsMake(.0, button.titleLabel.bounds.size.width, .0, - button.titleLabel.bounds.size.width);
语法解释:
- title的 左边线 内偏移 – (imageView.width +10)<=> 等价于 title的左边线 向 内偏移的反方向 移动 (image.width +10)
- title的 右边线 内偏移 imageView.width <=> 等价于 title的右边线 向 内偏移的正方向 移动 imageView.width
- image的 左边线 内偏移 titleLabel.width <=> 等价于 image的左边线 向 内偏移的正方向 移动 titleLabel.width
- image的 右边线 内偏移 – titleLabel.width <=> 等价于 title的左边线 向 内偏移的反方向 移动 titleLabel.width
是不是有点绕人?哈哈,不要慌,请看图解
场景三:上图下字
button.titleEdgeInsets = UIEdgeInsetsMake(button.imageView.frame.size.height + 10.0, - button.imageView.bounds.size.width, .0, .0);
button.imageEdgeInsets = UIEdgeInsetsMake(.0, button.titleLabel.bounds.size.width / 2, button.titleLabel.frame.size.height + 10.0, - button.titleLabel.bounds.size.width / 2);
语法解释:
- title的 上边线 内偏移 (imageView.height +10)<=> 等价于 title的上边线 向 内偏移的正方向 移动 (image.height +10)
- title的 左边线 内偏移 – imageView.width <=> 等价于 title的左边线 向 内偏移的反方向 移动 image.width
- image的 左边线 内偏移 titleLabel.width * 0.5 <=> 等价于 image的左边线 向 内偏移的正方向 移动 titleLabel.width 的一半
- image的 下边线 内偏移 titleLabel.height + 10 <=> 等价于 image的下边线 向 内偏移的正方向 移动 titleLabel.height + 10
- image的 右边线 内偏移 – titleLabel.width * 0.5 <=> 等价于 image的右边线 向 内偏移的反方向 移动 titleLabel.width 的一半
请看图解:
