本文将探讨涉及 SwiftUI TextField 的事件、焦点切换、键盘设置等相关的经验、技巧和注意事项。
转载:https://www.fatbobman.com/posts/textfield-event-focus-keyboard/
事件
onEditingChanged
当 TextField 获得焦点时(进入可编辑状态),onEditingChanged将调用给定的方法并传递true值;当 TextField 失去焦点时,再次调用方法并传递false。
struct OnEditingChangedDemo:View{
    @State var name = ""
    var body: some View{
        List{
            TextField("name:",text:$name,onEditingChanged: getFocus)
        }
    }

    func getFocus(focused:Bool) {
        print("get focus:\(focused ? "true" : "false")")
    }
}
该参数的名称容易让使用者产生歧义,不要使用onEditingChanged判断用户是否输入了内容。
在 iOS 15 中,新增的支持 ParseableFormatStyle 的构造方法不提供该参数,因此对于使用新 Formatter 的 TextField 需要使用其他的手段来判断是否获得或失去焦点。
onCommit
当用户在输入过程中按下(或点击)return键时触发 onCommit(无法通过代码模拟触发)。如果用户没有点击return键(比如直接切换至其他的 TextField),将不会触发 onCommit。触发 onCommit 的同时,TextField 也将失去焦点。
struct OnCommitDemo:View{
    @State var name = ""
    var body: some View{
        List{
            TextField("name:",text: $name,onCommit: {print("commit")})
        }
    }
}
如果你需要在用户输入后对用户的录入内容进行判断,最好结合 onCommit 和 onEdtingChanged 一起来处理。如果想实时的对用户的录入数据进行处理,请参阅 SwiftUI TextField 进阶——格式与校验。
onCommit 对 SecureField 同样适用。
在 iOS 15 中,新增的支持 ParseableFormatStyle 的构造方法不提供该参数,可以使用新增的 onSubmit 来实现同样效果。
onSubmit
onSubmit 是SwiftUI 3.0 的新增功能。onCommit 和 onEditingChanged 是每个 TextField 对自身状态的描述,onSubmit 则可以从更高的角度对视图中多个 TextField 进行统一管理和调度。
// onSubmit 的定义
extension View {
    public func onSubmit(of triggers: SubmitTriggers = .text, _ action: @escaping (() -> Void)) -> some View
}
下面的代码将实现同上面 onCommit 一样的行为:
struct OnSubmitDemo:View{
    @State var name = ""
    var body: some View{
        List{
            TextField("name:",text: $name)
                .onSubmit {
                    print("commit")
                }
        }
    }
}
onSubmit 的触发条件同 onCommit 一致,需要用户主动点击return。
onSubmit 同样适用于 SecureField。
作用域及嵌套
onSubmit 背后的是通过设置环境值TriggerSubmitAction(尚未对开发者开放)来实现的,因此 onSubmit 是有作用域范围的(可在视图树向上传递),且可嵌套。
struct OnSubmitDemo: View {
    @State var text1 = ""
    @State var text2 = ""
    @State var text3 = ""
    var body: some View {
        Form {
            Group {
                TextField("text1", text: $text1)
                    .onSubmit { print("text1 commit") }
                TextField("text2", text: $text2)
                    .onSubmit { print("text2 commit") }
            }
            .onSubmit { print("textfield in group commit") }
            TextField("text3", text: $text3)
                .onSubmit { print("text3 commit") }
        }
        .onSubmit { print("textfield in form commit1") }
        .onSubmit { print("textfield in form commit2") }
    }
}
当 TextField(text1) commit 时,控制台输出为
textfield in form commit2
textfield in form commit1
textfield in group commit
text1 commit
请注意,调用的顺序是从外层向内的。
限定作用域
可以使用submitScope阻断作用域(限制在视图树上进一步传递)。比如,上面的代码中,在 Group 后面添加submitScope
   Group {
                TextField("text1", text: $text1)
                    .onSubmit { print("text1 commit") }
                TextField("text2", text: $text2)
                    .onSubmit { print("text2 commit") }
            }
            .submitScope()  // 阻断作用域
            .onSubmit { print("textfield in group commit") }
当 TextField1 commit 时,控制台输出为
text1 commit
此时 onSubmit 的作用域将被限定在 Group 之内。
当视图中有多个 TextField 时,通过 onSubmit 和 FocusState(下文介绍)的结合,可以给用户带来非常好的使用体验。
对 searchable 的支持
iOS 15 新增的搜索框在点击return时同样会触发 onSubmit,不过需要将 triggers 设置为 search:
struct OnSubmitForSearchableDemo:View{
    @State var name = ""
    @State var searchText = ""
    var body: some View{
        NavigationView{
            Form{
                TextField("name:",text:$name)
                    .onSubmit {print("textField commit")}
            }
            .searchable(text: $searchText)
            .onSubmit(of: .search) { //
                print("searchField commit")
            }
        }
    }
}
需要注意的是,SubmitTriggers 为 OptionSet 类型,onSubmit 对于SubmitTriggers内包含的值会通过环境在视图树中持续传递。当接受到的SubmitTriggers值不包含在 onSubmit 设置的SubmitTriggers时,传递将终止。简单的说,onSubmit(of:.search)将阻断 TextFiled 产生的 commit 状态。反之亦然。
例如,上面的代码,如果我们在 searchable 后面再添加一个onSubmt(of:.text), 将无法对 TextField 的 commit 事件进行响应。
 .searchable(text: $searchText)
            .onSubmit(of: .search) {
                print("searchField commit1")
            }
            .onSubmit {print("textField commit")} //无法触发,被 search 阻断
因此当同时对 TextFiled 以及搜索框做处理时,需要特别注意它们之间的调用顺序。
可以通过如下代码在一个 onSubmit 中同时支持 TextField 和搜索框:
.onSubmit(of: [.text, .search]) {
  print("Something has been submitted")
}
下面代码由于onSubmit(of:search)被放置在searchable之前也一样不会触发。
 NavigationView{
            Form{
                TextField("name:",text:$name)
                    .onSubmit {print("textField commit")}
            }
            .onSubmit(of: .search) { // 不会触发
                print("searchField commit1")
            }
            .searchable(text: $searchText)
        }
焦点
在 iOS 15 / macOS Moterey之前,SwiftUI 没有为 TextField 提供获得焦点的方法(例如:becomeFirstResponder),因此在相当长的时间里,开发者只能通过非 SwiftUI 的方式来实现类似的功能。
在 SwiftUI 3.0 中,苹果为开发者提供了一个远好于预期的解决方案,同 onSubmit 类似,可以从更高的视图层次来统一对视图中的 TextField 进行焦点的判断和管理。
基础用法
SwiftUI 提供了一个新的 FocusState 属性包装器,用来帮助我们判断该视图内的 TextField 是否获得焦点。通过focused将FocusState与特定的 TextField 关联起来。
struct OnFocusDemo:View{
    @FocusState var isNameFocused:Bool
    @State var name = ""
    var body: some View{
        List{
            TextField("name:",text:$name)
                .focused($isNameFocused)
        }
        .onChange(of:isNameFocused){ value in
            print(value)
        }
    }
}
上面的代码将在 TextField 获得焦点时将isNameFocused设置为true,失去焦点时设置为false。
对于同一个视图中的多个 TextField,你可以创建多个 FocusState 来分别关联对应的 TextField,例如:
struct OnFocusDemo:View{
    @FocusState var isNameFocused:Bool
    @FocusState var isPasswordFocused:Bool
    @State var name = ""
    @State var password = ""
    var body: some View{
        List{
            TextField("name:",text:$name)
                .focused($isNameFocused)
            SecureField("password:",text:$password)
                .focused($isPasswordFocused)
        }
        .onChange(of:isNameFocused){ value in
            print(value)
        }
        .onChange(of:isPasswordFocused){ value in
            print(value)
        }
    }
}
上述方法当视图中拥有更多的 TextField 时将变得很麻烦,而且不利于统一管理。好在,FocusState 不仅支持布尔值,还支持任何哈希类型。我们可以使用符合 Hashable 协议的枚举来统一管理视图中多个 TextField 的焦点。下面的代码将实现同上面一样的功能:
struct OnFocusDemo:View{
    @FocusState var focus:FocusedField?
    @State var name = ""
    @State var password = ""
    var body: some View{
        List{
            TextField("name:",text:$name)
                .focused($focus, equals: .name)
            SecureField("password:",text:$password)
                .focused($focus,equals: .password)
        }
        .onChange(of: focus, perform: {print($0)})
    }

    enum FocusedField:Hashable{
        case name,password
    }
}
显示视图后立刻让指定 TextField 获得焦点
通过 FocusState,可以方便的实现在视图显示后,立刻让指定的 TextField 获得焦点并弹出键盘:
struct OnFocusDemo:View{
    @FocusState var focus:FocusedField?
    @State var name = ""
    @State var password = ""
    var body: some View{
        List{
            TextField("name:",text:$name)
                .focused($focus, equals: .name)
            SecureField("password:",text:$password)
                .focused($focus,equals: .password)
        }
        .onAppear{
            DispatchQueue.main.asyncAfter(deadline: .now() + 0.5){
                focus = .name
            }
        }
    }

    enum FocusedField:Hashable{
        case name,password
    }
}
在视图初始化阶段赋值是无效的。即使在onAppear中,也必须要有一定延时才能让 TextField 焦点。
在多个的 TextFiled 之间切换焦点
通过使用 focused 和 onSubmit 的结合,我们可以实现当用户在一个 TextField 中输入完成后(点击return),自动让焦点切换到下一个 TextField 的效果。
struct OnFocusDemo:View{
    @FocusState var focus:FocusedField?
    @State var name = ""
    @State var email = ""
    @State var phoneNumber = ""
    var body: some View{
        List{
            TextField("Name:",text:$name)
                .focused($focus, equals: .name)
                .onSubmit {
                    focus = .email
                }
            TextField("Email:",text:$email)
                .focused($focus,equals: .email)
                .onSubmit {
                    focus = .phone
                }
            TextField("PhoneNumber:",text:$phoneNumber)
                .focused($focus, equals: .phone)
                .onSubmit {
                    if !name.isEmpty && !email.isEmpty && !phoneNumber.isEmpty {
                        submit()
                    }
                }
        }
    }

    private func submit(){
        // submit all infos
        print("submit")
    }

    enum FocusedField:Hashable{
        case name,email,phone
    }
}
上述代码也可以利用 onSubmit 的传递特性变成如下的模样:
List {
            TextField("Name:", text: $name)
                .focused($focus, equals: .name)
            TextField("Email:", text: $email)
                .focused($focus, equals: .email)
            TextField("PhoneNumber:", text: $phoneNumber)
                .focused($focus, equals: .phone)
        }
        .onSubmit {
            switch focus {
            case .name:
                focus = .email
            case .email:
                focus = .phone
            case .phone:
                if !name.isEmpty, !email.isEmpty, !phoneNumber.isEmpty {
                    submit()
                }
            default:
                break
            }
        }
结合设定的屏幕按钮(例如辅助键盘视图)或者快捷键,我们也可以让焦点向前改变或者跳转到其他特定的 TextField 上。
使用快捷键获得焦点
当一个视图中有多个 TextField(包括 SecureField)时,我们可以直接使用Tab键按顺序在 TextField 中切换焦点,但 SwiftUI 并没有直接提供使用快捷键让某个 TextField 获得焦点的功能。通过结合FocusState和keyboardShortcut可以在 iPadOS 和 MacOS 下获得这种能力。
创建支持快捷键绑定的focused:
public extension View {
    func focused(_ condition: FocusState<Bool>.Binding, key: KeyEquivalent, modifiers: EventModifiers = .command) -> some View {
        focused(condition)
            .background(Button("") {
                condition.wrappedValue = true
            }
            .keyboardShortcut(key, modifiers: modifiers)
            .hidden()
            )
    }

    func focused<Value>(_ binding: FocusState<Value>.Binding, equals value: Value, key: KeyEquivalent, modifiers: EventModifiers = .command) -> some View where Value: Hashable {
        focused(binding, equals: value)
            .background(Button("") {
                binding.wrappedValue = value
            }
            .keyboardShortcut(key, modifiers: modifiers)
            .hidden()
            )
    }
}
调用代码:
struct ShortcutFocusDemo: View {
    @FocusState var focus: FouceField?
    @State private var email = ""
    @State private var address = ""
    var body: some View {
        Form {
            TextField("email", text: $email)
                .focused($focus, equals: .email, key: "t")
            TextField("address", text: $address)
                .focused($focus, equals: .address, key: "a", modifiers: [.command, .shift,.option])
        }
    }

    enum FouceField: Hashable {
        case email
        case address
    }
}
当用户输入 ⌘ + T 时,负责 email 的 TextField 将获得焦点,用户输入⌘ + ⌥ + ⇧ + A 时,负责 address 的 TextField 获得焦点。

创建自己的 onEditingChanged
判断单个 TextField 的焦点状态最佳选择仍是使用onEditingChanged,但对于某些无法使用 onEditingChanged 的场合(比如新的 Formatter),我们可以利用 FocusState 来实现类似的效果。
- 对单个 TextField 进行判断
public extension View {
    func focused(_ condition: FocusState<Bool>.Binding, onFocus: @escaping (Bool) -> Void) -> some View {
        focused(condition)
            .onChange(of: condition.wrappedValue) { value in
                onFocus(value == true)
            }
    }
}
调用:
struct onEditingChangedFocusVersion:View{
    @FocusState var focus:Bool
    @State var price = 0
    var body: some View{
        Form{
            TextField("Price:",value:$price,format: .number)
                .focused($focus){ focused in
                    print(focused)
                }
        }
    }
}
- 对多个 TextField 进行判断
为了避免在 TextField 失去焦点后出现多次调用的情况,我们需要在视图层次保存上次获得焦点的 TextField 的 FocusState 值。
public extension View {
    func storeLastFocus<Value: Hashable>(current: FocusState<Value?>.Binding, last: Binding<Value?>) -> some View {
        onChange(of: current.wrappedValue) { _ in
            if current.wrappedValue != last.wrappedValue {
                last.wrappedValue = current.wrappedValue
            }
        }
    }

    func focused<Value>(_ binding: FocusState<Value>.Binding, equals value: Value, last: Value?, onFocus: @escaping (Bool) -> Void) -> some View where Value: Hashable {
        return focused(binding, equals: value)
            .onChange(of: binding.wrappedValue) { focusValue in
                if focusValue == value {
                    onFocus(true)
                } else if last == value { //只触发一次
                    onFocus(false)
                }
            }
    }
}
调用:
struct OnFocusView: View {
    @FocusState private var focused: Focus?
    @State private var lastFocused: Focus?
    @State private var name = ""
    @State private var email = ""
    @State private var address = ""
    var body: some View {
        List {
            TextField("Name:", text: $name)
                .focused($focused, equals: .name, last: lastFocused) {
                    print("name:", $0)
                }
            TextField("Email:", text: $email)
                .focused($focused, equals: .email, last: lastFocused) {
                    print("email:", $0)
                }
            TextField("Address:", text: $address)
                .focused($focused, equals: .address, last: lastFocused) {
                    print("address:", $0)
                }
        }
        .storeLastFocus(current: $focused, last: $lastFocused) //保存上次的 focsed 值
    }

    enum Focus {
        case name, email, address
    }
}
键盘
使用 TextField 不可避免的需要同软键盘打交道,本节将介绍几个同键盘有关例子。
键盘类型
在 iPhone 中,我们可以通过keyboardType来设定软键盘类型,方便用户的录入或限制录入字符范围。
比如:
struct KeyboardTypeDemo:View{
    @State var price:Double = 0
    var body: some View{
        Form{
            TextField("Price:",value:$price,format: .number.precision(.fractionLength(2)))
                .keyboardType(.decimalPad) //支持小数点的数字键盘
        }
    }
}
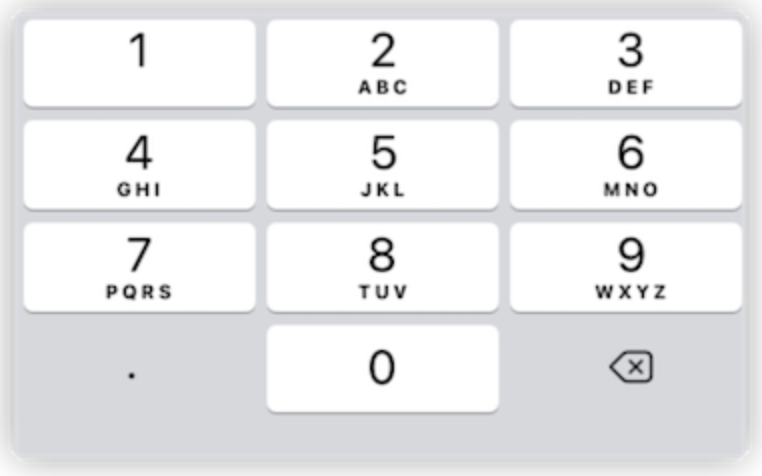
目前支持的键盘类型共有 11 种,分别为:
- asciiCapable
ASCII 字符键盘
- numbersAndPunctuation
数字及标点符号
- URL
便于输入 URL,包含字符和.、/、.com
- numberPad
使用区域设置的数字键盘(0-9、۰-۹、०-९ 等)。适用于正整数或 PIN
- phonePad
数字及其他电话中使用的符号,如*#+
- namePhonePad
方便录入文字及电话号码。字符状态同 asciiCapable 类似,数字状态同 numberPad 类似
- emailAddress
便于录入@.的 assiiCapable 键盘
- decimalPad
包含小数点的 numberPad,具体见上图
包含@#的 asciiCapable 键盘
- webSearch
包含.的 asciiCapable 键盘,return键标记为go
- asciiCapableNumberPad
包含数字的 asciiCapable 键盘
尽管苹果预置了不少键盘模式可以选择,不过在某些情况下仍无法满足使用的需要。
比如:numberPad、decimalPad 没有-及return。在 SwiftUI 3.0 之前,我们必须在主视图上另外绘制或者使用非 SwiftUI 的方式来解决问题,在 SwiftUI 3.0 中,由于添加了原生设置键盘辅助视图(下文具体介绍)的功能,解决上述问题将不再困难。
通过 TextContentType 获得建议
在使用某些 iOS app 时,在录入文字时会在软键盘上方自动提示我们需要输入的内容,比如电话、邮件、验证码等等。这些都是使用textContentType得到的效果。
通过给 TextField 设定 UITextContentType,系统在输入时智能地推断出可能想要录入的内容,并显示提示。
下面的代码在录入密码时,将允许使用钥匙串:
struct KeyboardTypeDemo: View {
    @State var password = ""
    var body: some View {
        Form {
            SecureField("", text: $password)
                .textContentType(.password)
        }
    }
}
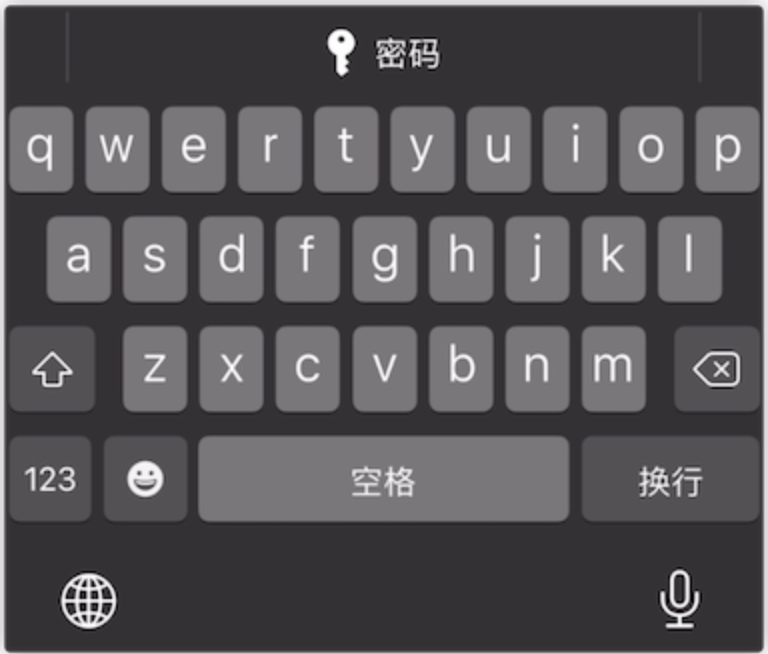
下面的代码在录入邮箱地址时,将从你的通讯录和邮件中查找相似的地址予以提示:
struct KeyboardTypeDemo: View {
    @State var email = ""
    var body: some View {
        Form {
            TextField("", text: $email)
                .textContentType(.emailAddress)
        }
    }
}
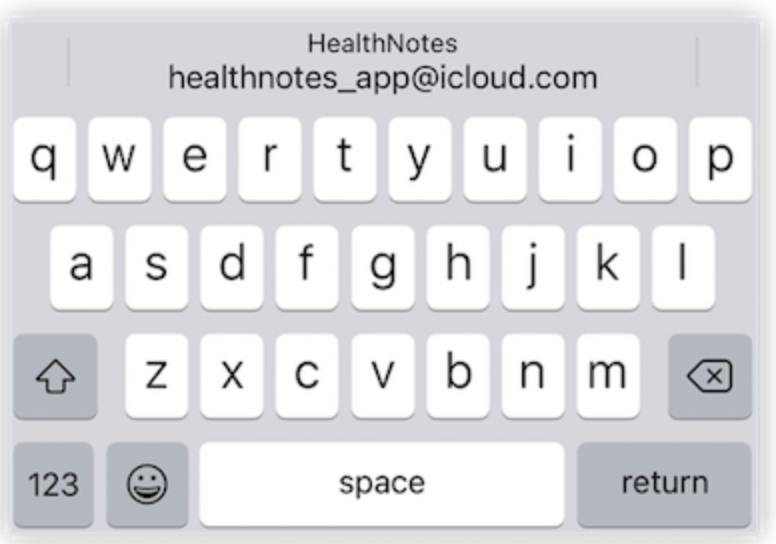
可以设定的 UITextContentType 种类有很多,其中使用的比较多的有:
- password
- 姓名的选项,如:name、givenName、middleName 等等
- 地址选项,如 addressCity、fullStreetAddress、postalCode 等等
- telephoneNumber
- emailAddress
- oneTimeCode(验证码)

取消键盘
有些情况下,在用户输入完毕后,我们需要取消软键盘的显示,以便留出更大的显示空间。某些键盘类型并没有return按键,因此我们需要使用编程的方式让键盘消失。
另外,有时候为了提高交互体验,我们可以希望用户在录入结束后,无需点击return按键,通过点击屏幕其他区域或者以滚动列表的方式来取消键盘。同样也需要使用编程的方式让键盘消失。
- 使用 FocusState 取消键盘
如果为 TextField 设置了对应的 FocusState,通过将该值设置为false或nil即可取消键盘
struct HideKeyboardView: View {
    @State private var name = ""
    @FocusState private var nameIsFocused: Bool

    var body: some View {
        Form {
            TextField("Enter your name", text: $name)
                .focused($nameIsFocused)

            Button("dismiss Keyboard") {
                nameIsFocused = false
            }
        }
    }
}
- 其他情况
更多的情况下,我们可以直接通过 UIkit 提供的方法来取消键盘
UIApplication.shared.sendAction(#selector(UIResponder.resignFirstResponder), to: nil, from: nil, for: nil)
例如下面的代码将在用户对视图进行拖拽时取消键盘:
struct ResignKeyboardOnDragGesture: ViewModifier {
    var gesture = DragGesture().onChanged { _ in
        UIApplication.shared.sendAction(#selector(UIResponder.resignFirstResponder), to: nil, from: nil, for: nil)
    }

    func body(content: Content) -> some View {
        content.gesture(gesture)
    }
}

extension View {
    func dismissKeyboard() -> some View {
        return modifier(ResignKeyboardOnDragGesture())
    }
}

struct HideKeyboardView: View {
    @State private var name = ""
    var body: some View {
        Form {
            TextField("Enter your name", text: $name)
        }
        .dismissKeyboard()
    }
}
键盘辅助视图
通过 toolbar 创建
在 SwiftUI 3.0 中,我们可以通过ToolbarItem(placement: .keyboard, content: View)来自创建键盘的辅助视图(inputAccessoryView)。
通过输入辅助视图,可以解决很多之前难以应对的问题,并为交互提供更多的手段。
下面的代码将为输入浮点数时添加正负转换以及确认按钮:
import Introspect
struct ToolbarKeyboardDemo: View {
    @State var price = ""
    var body: some View {
        Form {
            TextField("Price:", text: $price)
                .keyboardType(.decimalPad)
                .toolbar {
                    ToolbarItem(placement: .keyboard) {
                        HStack {
                            Button("-/+") {
                                if price.hasPrefix("-") {
                                    price.removeFirst()
                                } else {
                                    price = "-" + price
                                }
                            }
                            .buttonStyle(.bordered)
                            Spacer()
                            Button("Finish") {
                                UIApplication.shared.sendAction(#selector(UIResponder.resignFirstResponder), to: nil, from: nil, for: nil)
                                // do something
                            }
                            .buttonStyle(.bordered)
                        }
                        .padding(.horizontal, 30)
                    }
                }
        }
    }
}
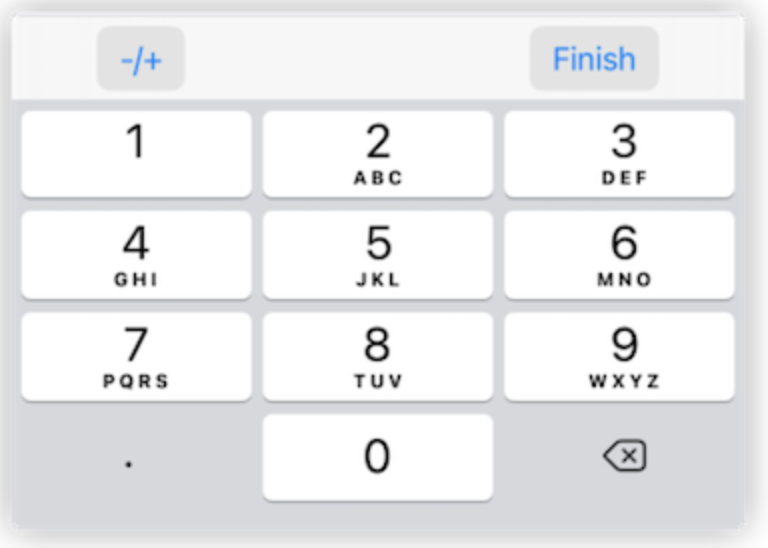
遗憾的时,通过 ToolbarItem 设置输入辅助视图目前还有以下不足:
- 显示内容受限
高度固定,且无法利用辅助视图的完整显示区域。同其他类型的 Toolbar 类似,SwiftUI 会干预内容的排版。
- 无法对同一视图中多个 TextField 分别设定辅助视图
在 ToolbarItem 中无法使用稍微复杂一点的判断语法。如果分别对不同的 TextField 进行设定,SwiftUI 会将所有的内容合并起来显示。

通过 UIKit 创建
当前阶段,通过 UIKit 来创建键盘辅助视图仍是 SwiftUI 下的最优方案。不仅可以获得完全的视图显示控制能力,并且可以对同一视图下的多个 TextField 进行分别设置。
extension UIView {
    func constrainEdges(to other: UIView) {
        translatesAutoresizingMaskIntoConstraints = false
        NSLayoutConstraint.activate([
            leadingAnchor.constraint(equalTo: other.leadingAnchor),
            trailingAnchor.constraint(equalTo: other.trailingAnchor),
            topAnchor.constraint(equalTo: other.topAnchor),
            bottomAnchor.constraint(equalTo: other.bottomAnchor),
        ])
    }
}

extension View {
    func inputAccessoryView<Content: View>(@ViewBuilder content: @escaping () -> Content) -> some View {
        introspectTextField { td in
            let viewController = UIHostingController(rootView: content())
            viewController.view.constrainEdges(to: viewController.view)
            td.inputAccessoryView = viewController.view
        }
    }

    func inputAccessoryView<Content: View>(content: Content) -> some View {
        introspectTextField { td in
            let viewController = UIHostingController(rootView: content)
            viewController.view.constrainEdges(to: viewController.view)
            td.inputAccessoryView = viewController.view
        }
    }
}
调用:
struct OnFocusDemo: View {
    @FocusState var focus: FocusedField?
    @State var name = ""
    @State var email = ""
    @State var phoneNumber = ""
    var body: some View {
        Form {
            TextField("Name:", text: $name)
                .focused($focus, equals: .name)
                .inputAccessoryView(content: accessoryView(focus: .name))

            TextField("Email:", text: $email)
                .focused($focus, equals: .email)
                .inputAccessoryView(content: accessoryView(focus: .email))

            TextField("PhoneNumber:", text: $phoneNumber)
                .focused($focus, equals: .phone)
        }
        .onSubmit {
            switch focus {
            case .name:
                focus = .email
            case .email:
                focus = .phone
            case .phone:
                if !name.isEmpty, !email.isEmpty, !phoneNumber.isEmpty {}
            default:
                break
            }
        }
    }
}

struct accessoryView: View {
    let focus: FocusedField?
    var body: some View {
        switch focus {
        case .name:
            Button("name") {}.padding(.vertical, 10)
        case .email:
            Button("email") {}.padding(.vertical, 10)
        default:
            EmptyView()
        }
    }
}

自定义 SubmitLabel
默认情况下,TextField(SecureField)在键盘上对应的 submit 行为按钮为return,通过使用 SwiftUI 3.0 中新增了submitLabel修饰器,我们可以将return按钮修改成更符合输入上下文的显示文字。
TextField("Username", text: $username)
            .submitLabel(.next)
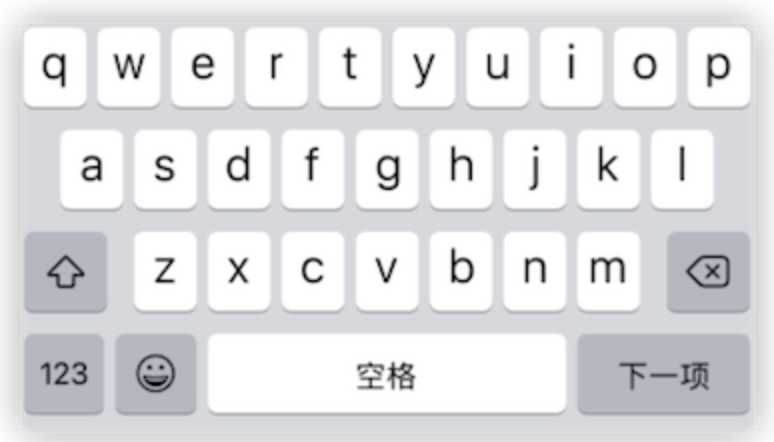
目前支持的种类有:
- continue
- done
- go
- join
- next
- return
- route
- search
- send
例如之前的代码中,我们可以分别为name、email、phoneNumber设定不同的对应显示:
            TextField("Name:", text: $name)
                .focused($focus, equals: .name)
                .submitLabel(.next)

            TextField("Email:", text: $email)
                .focused($focus, equals: .email)
                .submitLabel(.next)

            TextField("PhoneNumber:", text: $phoneNumber)
                .focused($focus, equals: .phone)
                .submitLabel(.return)
总结
从 SwiftUI 1.0 开始,苹果持续不断地完善 TextField 的功能。在 3.0 版本中,SwiftUI 不仅提供了更多的原生修饰器,而且提供了 FocusState、onSubmit 此类的统合管理逻辑。相信再有 2-3 年,SwiftUI 的主要控件的原生功能就可以比肩对应的 UIKit 控件了。