GeometryReader是一个容器视图,根据其自身大小和坐标空间定义其内容。
/// A container view that defines its content as a function of its own
/// size and coordinate space. Returns a flexible preferred size to its
/// parent layout.
@available(iOS 13.0, OSX 10.15, tvOS 13.0, watchOS 6.0, *)
@frozen public struct GeometryReader<Content> : View where Content : View {

    public var content: (GeometryProxy) -> Content

    @inlinable public init(@ViewBuilder content: @escaping (GeometryProxy) -> Content)

    /// The type of view representing the body of this view.
    ///
    /// When you create a custom view, Swift infers this type from your
    /// implementation of the required `body` property.
    public typealias Body = Never
}
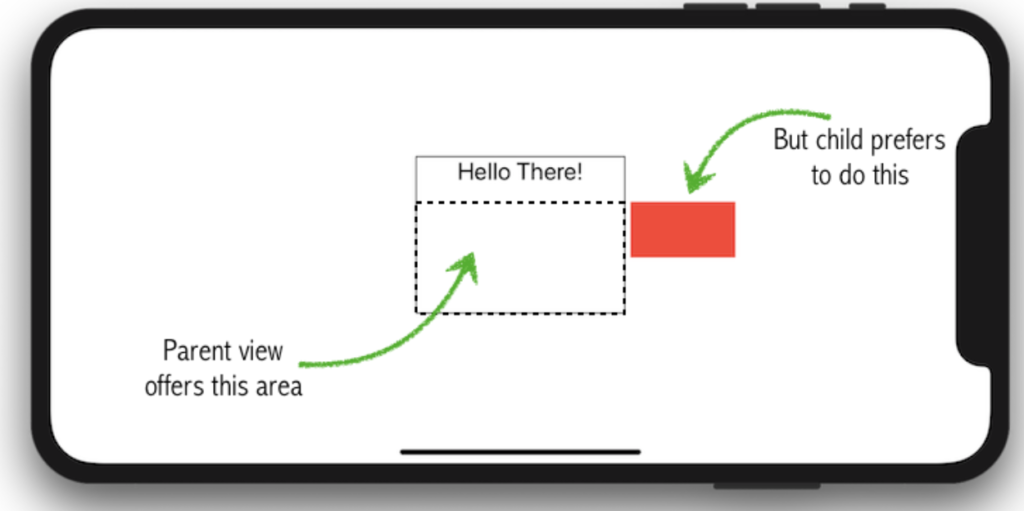
如果你想要自定义绘制一个矩形,大小是父级视图的一半。位置位于父级视图右边距里5像素的视图。 此时就可以使用GeometryReader。
struct ContentView: View {
    var body: some View {
        VStack {
            Text("Hello There!")
            MyRectangle()

        }.frame(width: 150, height: 100).border(Color.black)
    }
}

struct MyRectangle: View {
    var body: some View {
        GeometryReader { geometry in
            Rectangle()
                .path(in: CGRect(x: geometry.size.width + 5,
                                 y: 0,
                                 width: geometry.size.width / 2.0,
                                 height: geometry.size.height / 2.0))
                .fill(Color.red)
        }
    }
}
GeometryProxy
GeometryReader尾随闭包类型是:
(GeometryProxy) -> Content
GeometryProxy类中有两个计算型属性,一个方法,和一个下标取值:
/// Acts as a proxy for access to the size and coordinate space (for
/// anchor resolution) of the container view.
@available(iOS 13.0, OSX 10.15, tvOS 13.0, watchOS 6.0, *)
public struct GeometryProxy {

    /// The size of the container view.
    ///父级视图建议的大小
    public var size: CGSize { get }

    /// Resolves the value of `anchor` to the container view.
    ///通过下标取值来获取一个锚点
    public subscript<T>(anchor: Anchor<T>) -> T { get }

    /// The safe area inset of the container view.
    ///容器视图safeAreaInsets
    public var safeAreaInsets: EdgeInsets { get }

    /// The container view's bounds rectangle converted to a defined
    /// coordinate space.
    ///父级视图建议区域的大小位置
    public func frame(in coordinateSpace: CoordinateSpace) -> CGRect
}
父级视图会自动安排GeometryReader的视图大小,如下例:
struct ContentView: View {
    var body: some View {
        VStack {
            GeometryReader { geo in
                Text("Hello, World!")
                    .frame(width: geo.size.width * 0.9, height: 40)
                    .background(Color.red)
            }.background(Color.green)

            Text("More text")
                .background(Color.blue)
        }
    }
}

可以看到,“More text”被推到了底部,而GeometryReader占据了剩余的所有空间,但是这是一个首选大小,而不是绝对大小,这意味着它仍然依赖于它的父级。
接下来重点来了:
public func frame(in coordinateSpace: CoordinateSpace) -> CGRect
frame方法暴露给我们了父级视图建议区域的大小位置,可以通过 .local / .global / .named() 来获取不同的坐标空间。
如下例:
struct OuterView: View {
    var body: some View {
        VStack {
            Text("Top")
            InnerView()
                .background(Color.green)
            Text("Bottom")
        }
    }
}

struct InnerView: View {
    var body: some View {
        HStack {
            Text("Left")
            GeometryReader { geo in
                Text("Center")
                    .background(Color.blue)
                    .onTapGesture {
                        print("Global center: \(geo.frame(in: .global).midX) x \(geo.frame(in: .global).midY)")
                        print("Custom center: \(geo.frame(in: .named("Custom")).midX) x \(geo.frame(in: .named("Custom")).midY)")
                        print("Local center: \(geo.frame(in: .local).midX) x \(geo.frame(in: .local).midY)")
                    }
            }
            .background(Color.orange)
            Text("Right")
        }
    }
}

struct ContentView: View {
    var body: some View {
        OuterView()
            .background(Color.red)
            .coordinateSpace(name: "Custom")
    }
}
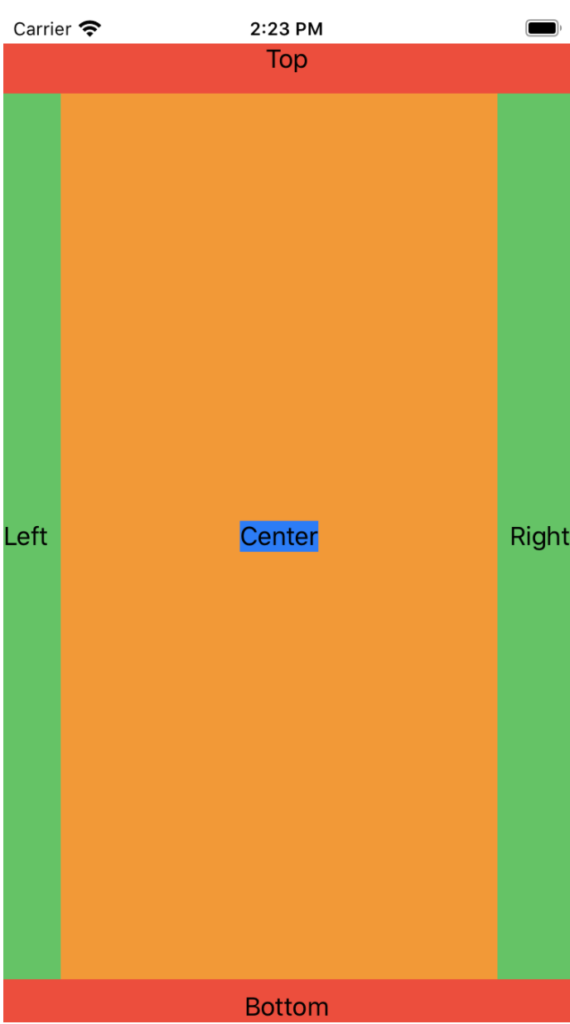
输出为:
Global center: 182.5 x 345.75
Custom center: 182.5 x 325.75
Local center: 144.5 x 292.75
3个点输出的坐标都不同,是因为它们的坐标系参照点是不同的:
- .global的(0,0)是整个屏幕的左上角,包括了safe area,
- OuterView通过修饰符“.coordinateSpace(name: “Custom”)”自定义了坐标空间,.named()的(0,0)是OuterView左上角,不包括safe area,
- .local的(0,0)是InnerView左上角
你想使用哪个坐标空间取决于你想回答的问题:
- 想知道这个视图在屏幕上的什么位置?使用全局空间。
- 想知道这个视图相对于它的父视图的位置吗?使用本地空间。
- 如何知道这个视图相对于其他视图的位置?使用自定义空间。
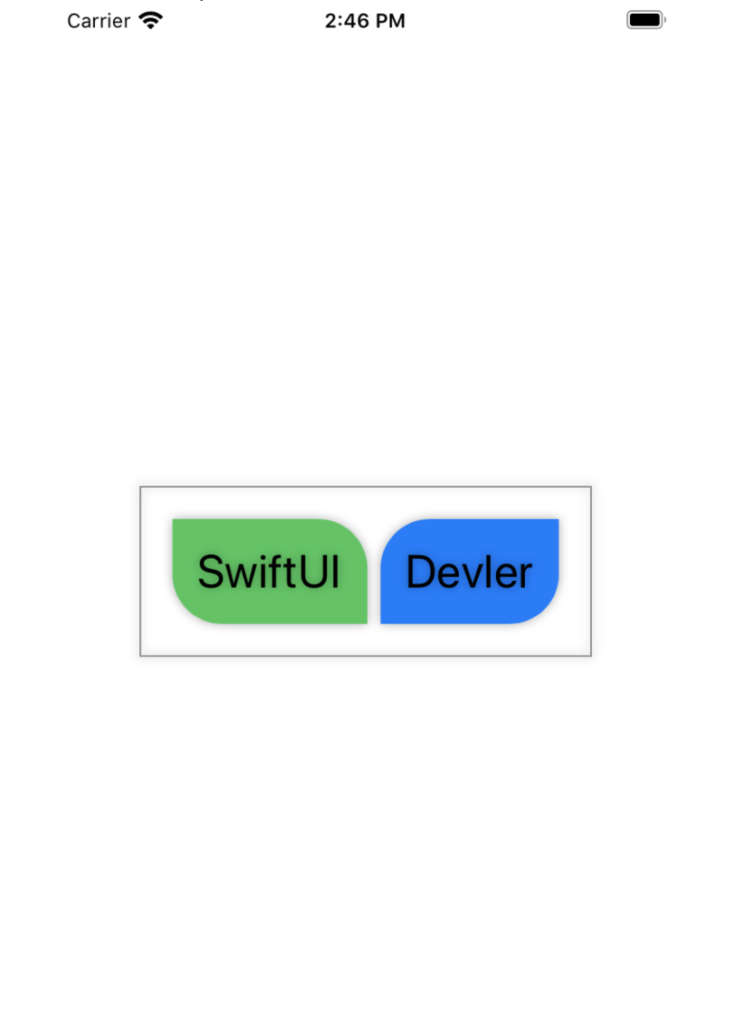
下面我们使用GeometryReader画一个每个角指定不同的半径的矩形。
struct ContentView: View {
    var body: some View {
        HStack {
            Text("SwiftUI")
                .foregroundColor(.black).font(.title).padding(15)
                .background(RoundedCorners(color: .green, tr: 30, bl: 30))
            // .overlay(RoundedCorners(color: .green, tr: 30, bl: 30).opacity(0.5))
            Text("Devler")
                .foregroundColor(.black).font(.title).padding(15)
                .background(RoundedCorners(color: .blue, tl: 30, br: 30))
            // .overlay(RoundedCorners(color: .blue, tl: 30, br: 30).opacity(0.5))

        }.padding(20).border(Color.gray).shadow(radius: 3)
    }
}

struct RoundedCorners: View {
    var color: Color = .black
    var tl: CGFloat = 0.0
    var tr: CGFloat = 0.0
    var bl: CGFloat = 0.0
    var br: CGFloat = 0.0

    var body: some View {
        GeometryReader { geometry in
            Path { path in

                let w = geometry.size.width
                let h = geometry.size.height

                // We make sure the redius does not exceed the bounds dimensions
                let tr = min(min(self.tr, h / 2), w / 2)
                let tl = min(min(self.tl, h / 2), w / 2)
                let bl = min(min(self.bl, h / 2), w / 2)
                let br = min(min(self.br, h / 2), w / 2)

                path.move(to: CGPoint(x: w / 2.0, y: 0))
                path.addLine(to: CGPoint(x: w - tr, y: 0))
                path.addArc(center: CGPoint(x: w - tr, y: tr), radius: tr, startAngle: Angle(degrees: -90), endAngle: Angle(degrees: 0), clockwise: false)
                path.addLine(to: CGPoint(x: w, y: h - br))
                path.addArc(center: CGPoint(x: w - br, y: h - br), radius: br, startAngle: Angle(degrees: 0), endAngle: Angle(degrees: 90), clockwise: false)
                path.addLine(to: CGPoint(x: bl, y: h))
                path.addArc(center: CGPoint(x: bl, y: h - bl), radius: bl, startAngle: Angle(degrees: 90), endAngle: Angle(degrees: 180), clockwise: false)
                path.addLine(to: CGPoint(x: 0, y: tl))
                path.addArc(center: CGPoint(x: tl, y: tl), radius: tl, startAngle: Angle(degrees: 180), endAngle: Angle(degrees: 270), clockwise: false)
            }
            .fill(self.color)
        }
    }
}