在springboot中,我们经常可以看到一些如xxx-starter-xxx的maven坐标,典型是spring-boot-starter-web。SpringBoot可以实现将常用的场景抽取成了一个个starter(场景启动器),使用者通过引入springboot提供的这些启动器,搭配少量的配置就能实现相应的功能。
在公司的内部往往会有一些封装的中间件,这些封装的中间件需要被其他项目依赖,其他的项目直接引入starter便可以实现自动化配置。下面我们来聊聊如何自定义一个starter。
1、自定义starter
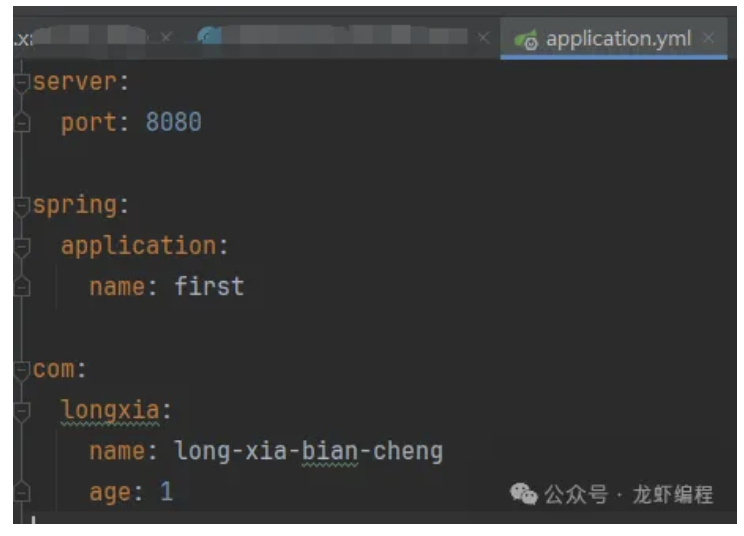
需求描述:通过自定义的starter,实现每个项目中配置不同的参数值,并且读取这个配置的值。
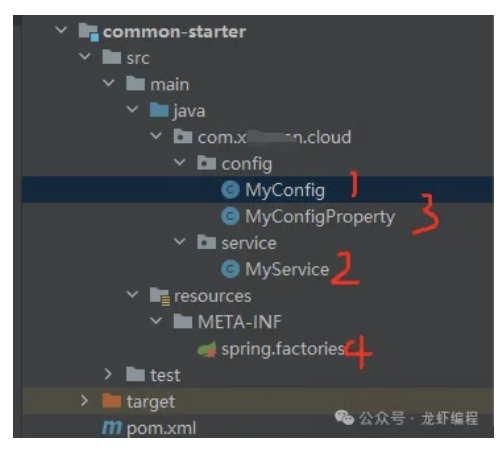
项目的工程的结构如下所示:

(1)在自定义starter模块中添加必要依赖
<dependencies>
    <dependency>
        <groupId>org.springframework.boot</groupId>
        <artifactId>spring-boot-autoconfigure</artifactId>
    </dependency>

    <dependency>
        <groupId>org.springframework.boot</groupId>
        <artifactId>spring-boot-autoconfigure-processor</artifactId>
    </dependency>

    <dependency>
        <groupId>org.springframework.boot</groupId>
        <artifactId>spring-boot-starter-web</artifactId>
    </dependency>
</dependencies>
(2)自定义读取配置的配置类
@Component
@ConfigurationProperties("com.longxia")
@Data
public class MytConfigProperty {

    private String name;

    private Integer age;
}
(3)定义service
public class MyService {

    private MyConfigProperty myConfigProperty;

    public MyFirstService() {

    }

    public MyService(MytConfigProperty myConfigProperty) {
        this.myConfigProperty = myConfigProperty;
    }

    public String say(){
        return "myStarter " + myConfigProperty.getName() + " !";
    }

}
(4)添加service的配置
@Configuration
//开启配置文件的数据注入
@EnableConfigurationProperties({MytConfigProperty.class})
public class MyConfig {

    @Resource
    private MyConfigProperty myConfigProperty;

    @Bean
    public MyFirstService getMyFirstService(){
        return new MyFirstService(myFirstConfigProperty);
    }

}
(5)编写spring.factories
org.springframework.boot.autoconfigure.EnableAutoConfiguration=\
com.longxia.spring.starter.config.MyConfig
spring.factories的目的是让我们配置的starter可以被其他项目的在启动的时候扫描到。
2、使用自定义的starter
(1)添加自定义的starter的依赖
<dependency>
    <groupId>com.longxia.cloud</groupId>
    <artifactId>common-starter</artifactId>
    <version>1.0-SNAPSHOT</version>
</dependency>
(2)在使用者中添加配置文件属性值

(3)定义controller,测试效果
@RestController
@RequestMapping("/starter")
public class MyFirstStarterController {

    @Resource
    private MytService myService;

    @GetMapping("/first")
    public String first() {
        return mytService.hello();
    }

}
在浏览器上输入:http://localhost:8080/starter/first

到此自定义的starter的就完成了,如果哪个业务模块中需要使用封装的common-starter,直接引入其maven依赖并且做相应的配置就可以使用了。